

No matter what you collect, taking care of it is of paramount importance. As any collector knows, the value of a collectible is directly related to it's condition and appearance, even to items of little value. As important as maintaining value may be, however, I personally feel that I am a 'preserver' of history; the lure I have today may well be in the hands of some collector in the distant future, perhaps hundreds of years from now! Who is to say?
There is one rule I follow in all of my collecting interests and that is to try as much as possible to maintain the item as close to it's original condition as possible with minimal action on my part. This is not always an easy task and can require difficult decisions, i.e., if I do nothing, the paint will flake off vs. applying glue to keep it from flaking further.
With that in mind, here are some things which you might consider when cleaning and caring for your collectible fishing tackle.
CLEANING RUBBER BAITS by John Walker
The best thing for restoring and cleaning rubber baits is GO-JO or M-30 lanolin based hand cleaner. It not only will clean off the sticky stuff but will also restore the "factory fresh" smell to the baits. What you need to do is wipe on the cleaner and squish it around on the bait. Next you need to let it sit for anywhere between 30 minutes and an hour. After you let it cure for this time rinse it with warm water then cold water and pat it dry. You will now have a clean fresh bait .
HOW TO SAVE THAT SPECIAL UMCO BOX by Ted Lanham
I had this nice old UMCO (tackle) box around that someone had loaded with rubber worms that burned the trays completely up. I liked the box so I didn't want to trash it. I couldn't find anything in the way of replacement trays anywhere, so I decided that maybe I could "Hooverize" it with some cork and cedar. I think this might be the answer for some of you guys that are in the same situation.
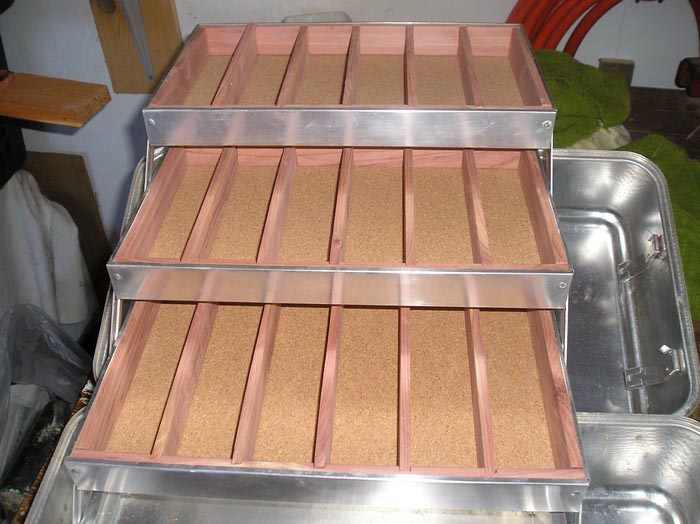
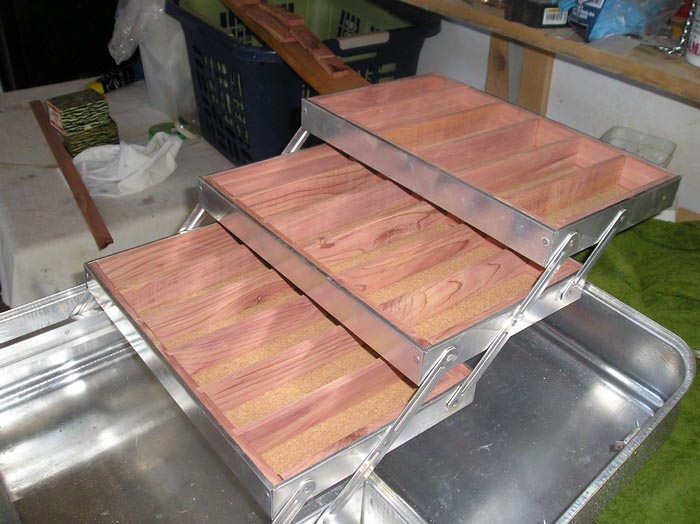
(Click on either picture to enlarge)
(Special thanks to Ted for providing the pictures and his restoration technique! These boxes came with plastic trays which tended to crack, split or melt if they came in contact with plastic/rubber worms, etc., leaving them useless or at the very least, ugly!)
PAINT REMOVAL
Fishermen painted many old wooden lures because they didn’t like the color of the lure or thought that they would seal up the cracks and prevent paint loss due to water getting into the wooden body. If the lure was in good shape before being over-coated it may be exceptionally well preserved by the overcoat. Not all over-paints can be successfully removed but if you understand some basics, you may be surprised by some of your successes.
There are several considerations that go into the possible cleaning of any lure. First what was the original paint job, lacquer or enamel? Second what is it now covered with, varnish, shellac, lacquer or enamel paint? Fishermen often used varnish to seal their lures. The cheaper the grade of varnish, the darker brown it will have turned and the easier it will be to remove. I usually start with a Q-tip with a little ammonia on it. Rub it on the lure on an inconspicuous spot and look at the Q-tip. If it is varnish, the Q-tip will be brown and the varnish will dissolve very quickly. I personally use Q-tips to clean the entire lure and discard each Q-tip as is becomes dirty. On some easier cases it is possible to place a lure in a 50% water ammonia solution and by shaking it vigorously complete the job in a brief time. Rinse the lure off and dry it as soon as you are done. Under no circumstances leave a lure in ammonia for any length of time. If left in the ammonia too long, all paint will be removed and brass hardware will be etched. I have seen the belly weights fall out of a Heddon 100 when left in ammonia overnight!
In all these cleaning processes we are counting on the fact that the original paint job is of much higher quality than what the fisherman later added. We are working against time, removing the weak paint or coating before the higher quality paint has time to be affected. If the original paint is not of the highest quality, ammonia will soon remove it too. Examples of lures that would be quickly ruined would be: the red flutes on a Wilson’s Wobbler, an early Bud Stewart, a Mushroom Bait, early Moonlight etc.
If the old brown coating on the lure does not dissolve quickly when treated with ammonia, it is probably shellac. Shellac can be removed using the same alcohol that the paint store sells to thin shellac. This is a very slow process and requires a great deal of effort working with Q-tips on one small area at a time. Go slow and be patient. Often cheap enamel paint was used to cover a lure. Try ammonia on a Q-tip and rub vigorously on a small area. The paint may simply dissolve or buckle up as if it were hit with Zip Strip. If so, you’re in luck.
Many over-paints and repairs were done with lacquer. Often, early tackle boxes included a bottle of nail polish. It came in a small bottle with its own brush and being lacquer, it dried quickly and was waterproof. Lacquer is dissolved with lacquer thinner very quickly. Unfortunately most other forms of paint are close behind in the time they take to dissolve under the influence of lacquer thinner. If the bait was in good shape with a top quality enamel paint job, it may be possible to remove the lacquer using Q-tips and lacquer thinner, working for brief periods on small areas of the lure. It is important to stop frequently and allow the whole project to harden up from the effects of lacquer thinner. Unfortunately, the color pigments used in the lacquer may have leached into the original paint job. This is particularly noticeable on white lures that have been touched up with red nail polish. If the bait’s original paint job was common lacquer such as the paint used on Paw Paw, Isle Royal, Chippewa’s and many others, do not put lacquer thinner on it or you will see the original paint job go up in smoke.
Finally, a lure directly from an old tackle box is often incredibly dirty. I always try ‘Fantastic’ on a Q-tip for starters. Again, check the Q-tip to see if you are removing dirt and if so change Q-tips often. When given this treatment, some lures may not look any different, but the next one will be so changed as to be startling!
(Thanks to Bill Sonnett for this great tip!)
REMOVING STUBBORN SCREWS
I learned the hard way for removing stubborn screws and screw eyes from PLASTIC baits...If you have one that you even THINK might break off in the lure when you have to remove the hardware...heat it up (I use a soldering iron) and the heat will transfer down the shaft of the rusted screw or eye, slightly melting the plastic and the screw will come right out! Of course you have to time it right, you would not want to melt too much plastic! I use the soldering tip like a screwdriver, holding it on the screw with a litle pressure until it begins to back out, then shift quickly to regular screwdriver. Living on the coast of Virginia, a lot of the plastic stuff I find needs new hooks..to fish with or be replaced with EXACT hooks off a similar bait...Hope this helps someone! I wish I knew this before I broke off so many screws on my plastic baits. (Thanks to Dennis McNulty for this great tip!)
CLEANING RUSTY HARDWARE (Update)
Before I make any attempt to clean rusty hardware, I first check to see what the overall condition of the hardware is. If the hardware appears to be too fragile to sustain cleaning, leave it alone. Rusting can be so severe as to weaken the metal and any attempt at cleaning could cause damage.
Next, make sure what you want to clean is rust! Hooks often were coated with a protectorant which should be left on, not removed. Hooks that are dull gray or grayish-white should not be cleaned absent obvious dirt and grime.
The next consideration is removing the hardware. In general, it isn't a good idea to remove hardware, particularly with older wooden lures as the likelihood of damage the paint, lure, and the hardware is great. Even plastic lures can sustain damage while removing hardware.
Early on, I used to remove hardware and use rust remover products to try to clean it and had very mixed success. Not only did I occasionally screw up a lure but often the rust remover didn't work that well and of course, I was dealing with some pretty caustic stuff.
Another solution I've found was when I purchased one of those small power tools which they advertise on TV which has bits which polish, cut, etc., made by Drumel or Ryobi. These have very fine polishing bits which do a really nice job of cleaning hardware. I would caution you to practice on some junkers before taking on something of value. Use very light pressure and make sure you protect the lure if you are cleaning it with the hardware still on. Above all, be careful!
HOW TO CLEAN AND DRESS UP MINNOW BUCKETS
You can clean your bucket using Murphys Oil soap and wiping it down gently or use plain dish soap and water the same way; never use anything harsher. Let the bucket dry thoroughly and than wipe the entire bucket down with Vegetable oil ( yes steal some off the wife); a little goes along way. Wipe the entire bucket down (wood handle, wire bail, etc. and the exterior) I never do the inserts just the visable stuff. Use the veggie oil (2) times as to not miss any parts. I even use a q-tip around tough to get at areas. After you have it wiped down. let it sit for 1/2 hr. and then take a clean dry cloth and wipe down the entire bucket just to take off any excess. You can use this method on painted, galvanized, zinc, copper, etc. and it will make that bucket POP. See my minnow bucket article in the NFLCC magazine from a while ago.(Special thanks to Randy Spagnoli for this tip!)
CLEANIING FUR FINISH LURES
Some companies such as Heddon produced lures that had a fur-like finish. Cleaning these lures poses a special problem since you can rub the 'fur' off the body with too vigorous a cleaning. The best way to clean a fur finish lure is to use warm water and dish soap. You can use your finger as cleaning tool though I've used a soft bristle toothbrush (a clean one!). Wet the lure and apply the dish soap and lightly (and I repeat, LIGHTLY) scrub. Repeat as often as necessary to remove and grime. When done, rinse thoroughly to insure all the soap in washed out and then air dry. These fur finishes can become stained from all sorts of things so face the fact that not everything will be removable. (Special thanks to Ron Hanley for this tip!)
CLEANING CARDBOARD BOXES
A couple of suggestions from other collectors for cleaning cardboard boxes:
- Wallpaper cleaner can be used to clean up your cardboard boxes and does not hurt them as long as you don't go to excess. Use a product called asorene which comes in pint cans for a price of $3.19. Can be found at most good wallpaper and paint stores. (billy)
- Eraser Powder, available at office supply stores or blueprint shops also does a good job (Jesse Jones, NFLCC, Texas)
CLEANING OIL SOAKED BOXES
Lure & reel boxes are often found with oil stains. Here's a tip from collector John Kruzan on removing or at least diminishing the stain:
"Buy a bag of fine grained Kitty Litter; take a plastic tupperware container and put about an inch in the bottom then put the bottom on the box and the top of the box flat sides down on the kitty litter then fill both halves of the boxes and the rest of the plastic container with kitty litter, then snap the top on the plastic container and go on a cruise. The more oil in the cardboard, the longer the cruise. Don't rush it! The process works just let time do it's thing. The kitty litter leaves a very fine dust in places and a soft bristle paint brush will remove it easily. Compressed air like you use to clean key boards also works well, just don't hold it right next to a box because it might tear the overlay paper."
REMOVING DRIED RUBBER
Among the many things that can be stuck on a lure is rubber. The source is usually from things like old rubber worms or rubber skirts that were used on lures such as the Argogast's Hula Popper. Trying to pick the rubber off is not a good idea since the
lure's paint can come off with the rubber! One method that I've found very effective is to place the affected part in a small dish of warm, soapy water (dishsoap works just fine). Let it soak for 15 minutes or so then check it. The rubber should
easily come off with just a touch of your finger. It might be necessary to soak a longer time in some cases but the results should be the same. If this fails to work, some other suggestions include the following:
- Rub gently with turpentine; use your finger first or a soft cloth
- Rub with baby oil or straight dish detergent to soften the rubber; allow time to soak in; could be hours
CLEANING FEATHERS
The feathers on lures, particularly those early metal 'bucktail' types, get grey and grungy looking. A couple of suggestions for cleaning from collectors that worked for me are as follows:
- Use Go-Jo or other lanolin based hand cleaner. Stay away from the orange based ones they have pumice in them. The cleaner will not only whiten but treat the feathers and preserve and soften. That material is a miracle worker on all kinds of problems I have come up against. (John Walker)
- I have had really good luck washing some different feather tailed baits in a very diluted woolite and cold water solution, then patting them dry ( after a good rinsing in cool water ). Got rid of a lot of tackle box grime this way! (Steve Morris) - (Note: Good idea to let soak for a time!)
HOMEMADE CLEANING SOLUTION
Ralph Palmer of New Jersey writes, "Here's a mixture I learned about at the Carlisle Show this year. 1/3 boiled linseed oil, 1/3 turpentine, 1/3 white vinegar I have tried it and it works. With a little rubbing it even cleans white CCBCs, which I have
found to be the toughest. It leaves a nice shine that doesn't seem artificial and the smell isn't too bad."
CLEANING FIREPLUG COLOR LURES
Wood lures in colors such as Fireplug, Rainbow Fire, or other similiar colors require special treatment as these colors are not intended to look 'shiny' but rather 'soft' or 'pastel'. The problem is if you use a cloth such as a Miracle cloth, you will
ruin the finish and may well rub off paint. One suggestion that works is to use 'Soft Scrub' which is a handsoap. Rub it on in a circular motion with your finger, then remove with a clean cotton cloth.
HUMIDITY AND STORAGE CONSIDERATIONS
NFLCC member Marie Munson posted this message on Joe's Old Lures Message Board that details her experiences with storage and humidity control:
I recently posted on Joe's board regarding a problem I was having with some of my lures getting "sudden" varnish flaking and paint chips. At the time, I suspected it was due to exposure to very dry air. Unfortunately, I lost 4 lures before I solved the problem. They were lost in only 4 days.
As I suspected, I isolated the problem to exposure to very dry air. I think that the dry air caused the lures to shrink, causing varnish flakes/cracks and in some cases causing the paint to "pop off" of the primer. It was interesting because I had not had a problem with my lures in 8+ years. I recently opened up my cases to "air them out", which I suspect created the problem for me.
I'm posting what I have learned to help other collectors. I'm not an expert, and I'm guessing that there are a 1,000 different opinions on the subject. I'll share my opinions, for what they are worth.
If the humidity level falls in the case, which it can do over a period of days or weeks, I open the case for a brief period of time to "let in" more humid air. Once the humidity reaches back above 40%, I close the case. In many cases, it takes only a matter of 15 minutes to get the humidity level back to where it should be.
This wasn't a problem for me, but I do keep my lures out of sunlight. I keep my cases covered with cloth to eliminate possible exposure to harmful ultraviolet light.
While I know that some people keep silica gel packages in their cases to keep moisture out, I found it was easier to keep the humidity level at the right level by keeping a very, very small cap (I use a cap from an Aquafina bottle) with water that doesn't contain minerals, etc. in my cases. This tiny dab of water helps keep the humidity in the cases fairly constant and keeps the air from drying out. I know that too much moisture can be a bad thing, so the monitoring device helps to make sure that it says around 40% humidity.
I did extensive research on the preservation and care of antiquities. Among the many articles I read and the many web sites I visited, I found a great article which discusses how to care for organic antiquities, like our precious wood lures which are largely made of organic material. The American Institute for Conservation of Historic and Artistic Works (AIC) web page, Basic Guidelines for the Care of Special Collections
If other people have opinions or information, even if it is contrary to my findings, please post it. This is an important area of learning for all of us and I think that sharing our knowledge and experience with one another can help us preserve these beautiful works of art for the next generation.
REMOVING STICKERS/LABELS/TAPE/STICKY STUFF
Unwanted labels, tags, tape and other 'sticky' stuff can be removed by a couple of different methods. A hair dryer used for a few seconds on the offending 'sticky' will cause it to come loose quite quickly. If it's just the glue or stickum remaining
that you want to remove, try using lighter fluid; put some on a cloth and rub gently and the stickem will be gone; nice too because it doesn't leave a stain. One word of warning: DO NOT use lighter fluid on plastic boxes as it will 'melt' the plastic!
Hot water (steam) is a better alternative.
ROD & REEL CLEANING by Gene Rockwell
Over the years I've used various methods and substances for cleaning rods
and reels. I've noticed an increase in advice to novices touting various
abrasives for cleaning cork handles. Actually, I like the look and feel of
"used cork." However, there comes a time when cleaning is needed. The
least invasive and destructive method is to use shampoo, the cheaper the
better, and a nylon bristle scrub brush. Most of the oils deposited on the
cork are from human hands and the primary purpose of shampoo is to remove
oil, so it's a perfect match.
When it comes to cleaning reels, I choose to err on the side of conservatism. With most antiques you're safe if you do nothing. My experience with truly antique reels is limited, but I would surmise that lightly scrubbing with mild soap and water should be OK. Newer reels, with their increasing use of manmade materials, may also be susceptible to solvents used as cleaning agents; particularly printing and decals. This still leaves a great many reels that I have successfully cleaned using the following techniques. I always test a small area of any reel to assure that whatever I may use will not be destructive. I choose a portion of the reel not easily seen - just in case. For reels left unmaintained for years, and with the accompanying build-up of gunk, an overnight soaking in kerosene does well. For stubborn deposits, the use of an old toothbrush will usually suffice. I also make good use of cotton tipped swabs, toothpicks, electric razor cleaning brushes, etc. While many advocate the use of "WD-40" type agents for cleaning, I don't. The fact that it is an effective penetrant and "rust buster" suggests to me that it contains compounds that I would rather avoid. To assist in the cleanup I use canned compressed air. When all is clean, it's time to lubricate. For this I use whatever the manufacturer recommends, if I have such information. When I don't, I use Abu Garcia reel oil, and reel lube. I never over oil - 1 or 2 drops at most. When in doubt as to what is used where, I use oil on rotating parts and the reel lube on meshing parts - gears. For appearance I rub the reel with a terry towel. Again, if it is a "collector" leave it as is. If it's a "user" the above methods should put it in good condition - providing all the parts are there and working. But that's another story.
REMOVING PAINT
To a collector, a lure that has been repainted is a true nightmare! Is it possible to remove the 'new' paint to get to the original finish? The answer depends upon the condition of the original finish underneath. In most cases, the original finish was
coated with varnish which means that the re-paint in many instances does not adhere well. Many of these suggestions were posted on message boards so where appropriate, I've so indicated:
"Before trying risky chemical cleaners, try using a paste made from baking soda and water rubbing it with your thumb in a polishing motion. It works on many types of paint if not covered by varnish, and is chemically inert. You won't go thru the original finish without hard prolonged rubbing, only buff up it's shine. Rinses clean of soda instantly. It works even better at cleaning dirt off lures." (Dave Twigg, posted on Angler's On-Line Message Board, 10/30/99).
Here are some suggestions that were posted on Joe's Message Board on 1/8/1999 from collectors as to how to remove paint:
"Try to examine the overcoat of paint very carefully, preferably with a loupe. Many old repaints are little more than washes, which do not adhere well to a finely varnished or lacquered lure, such as a Creek Chub. If you are brave and can find a place where the original paint is exposed, try scraping your thumbnail gently along the exposed edge of the paint. Don't try using a blade, you need the fexibility of your thumbnail. I once removed an entire overcoat from a 700 series Pikie and found a beautiful rainbow finish underneath using this method. When done, polish with wax or Flitz. Again, be careful and test carefully before you use this method. If the overcoat resists your nail, then go back to the more traditional methods. The main advantage to using your thumbnail is that it does not damage the original finish with abrasives." (Posted by LURE DUDE)
"You may luck out and have latex paint on top. If so, a product called GOOF OFF will removed the latex without harming the good paint underneath. It is available at Hdwe stores, Lowes, Home Depot, etc." (Posted by Steve Barrow) I have this product under the name of "OOPS" in my area.
"If the lure is not very valable try an abrasive (like Comet) and then to restore the shine give it a good rub-down with Flitz polish." (Posted by Tucker)(FLITZ polish is available in hardware stores and is a good, overall polish to use for the general cleaning and polishing of lures).
Remove the hooks and hardware and put in a zip-lock bag with a couple ounces of household ammonia. Gently rub the ammonia around the lure through the plastic bag. The old paint should start dissolving in the ammonia within a few seconds. If it doesn't, it probably is NOT going to work. Remove your lure, rinse it, return to your computer and ask someone smarter than me what to try next!" (Posted by Jack S.)
CORK HANDLES
A very simple way of cleaning the grunge that has accumulated on a cork handle is to use fine steel wool on the handle, the finer the grade of steel wool the better but at least fine. Wrap the steel wool around the handle and holding the rod firmly,
twist the steel wool back and forth AROUND the handle with a light to medium pressure. Work slowly and gently and after a couple of turns, check the cork. Continue as needed. (Note: Many collectors consider the 'grunge' as I referred to as a natural aging of the cork, i.e., the 'patina' and feel it better left alone as the removal may affect value.
Other suggestions offered by collectors which don't 'remove' any cork material include:
Mr. Clean Magic Eraser: Run warm water over sponge; squeeze until damp and rub lightly.
Rubbing alcohol: Don't get it on the laquered part of the rod
though. It cleans the grime off cork very fast and evaporates out of
the cork quickly without swelling the cork. Just wipe on and wipe
off.
Cleaning products like Fantastik, Simple Green or 409
CLEANING REELS
I'm not an expert on cleaning reels but I've found that in many cases, the grime and crud that accumulates on the surfaces are best removed using an old standby, WD40. Spray liberally and if especially bad, let soak. Scrub with a toothbrush and wipe
clean with paper handtowels. I've used a Miracle Cloth (see below on these) on reels but be warned that these can remove the silver plating on a reel thereby damage the reel.
A tip I read from a reel collector suggests you soak the reel in motor oil for 24 hours before cleaning...can't hurt!
Taking apart a reel for cleaning is another matter. If you feel so inclined, be warned that you better know what you are doing as putting them back together isn't as easy as taking them apart! Use a proper fitting screwdriver to remove screws because if you tear up the groove in a screw, it will affect the value. Reel collectors are a fussy group (much like lure guys so what's new...!) Be careful when pulling a reel apart as springs, gears and screws are easily lost! Don't forget to re-lube when done with an appropriate grease and/or reel oil.
As a 'preserver' of tackle, I always leave any line I found on the reel intact. I keep a extra reel on hand to wind the line onto so I can clean the reel. I rewind the line back on the reel after cleaning.
MIRACLE CLOTHS
The "Miracle Cloth" is a chemically treated cloth material which is commerically manufactured and sold throughout the country. According to the packaging, it does just about everything when it comes to cleaning and polishing, and indeed is an effective 'tool' a collector should add to their arsenal! I've used it to remove rust, tarnish, paint, grease and darn near anything if you rub it long enough! Moreover, it polishes as well and can brighten and shine pretty much anything.
As much as it has helped me, however, the Miracle Cloth must be used with caution. It will remove plating from reels and paint from lures if you rub too hard and in some cases, if you use it at all! Go to our parent site, My Bait Shop Miracle Cloth page if you would like to buy Miracle Cloths.

Comments? EMAIL ME!
Web Author: Keith Bell
Copyright ©2020 by My Bait Shop, LLC - ALL RIGHTS RESERVED